_edited.png)
- Coach Daniel

- Dec 11, 2023
- 2 min read
Updated: Jan 20, 2024
What is an ankle sprain?
When a marching band performer sprains their ankle (most often by rolling it), the ligaments that connect the bones are overstretched and sometimes torn. Rehabilitating from this can take anywhere from 3-12 weeks depending on the severity. Failure to fully recover before getting back on the floor increases the odds of it happening again!

Why does it happen?
The foot & ankle are the foundation for all movement. When the joint is not properly aligned and the stabilizing muscles are underdeveloped, the risk of collapsing is much higher. Check out the images below for examples of what this looks like!

Poor alignment contributes to instability.

Good alignment contributes to stability.
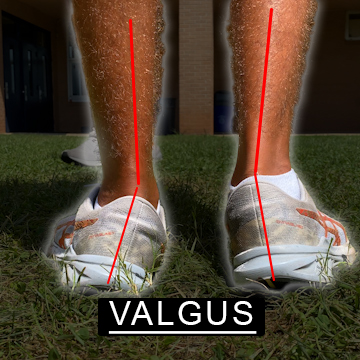
What does poor ankle alignment look like?
Take a look at the back of these two performers shoes and you can clearly see the muscle imbalance in their ankles.

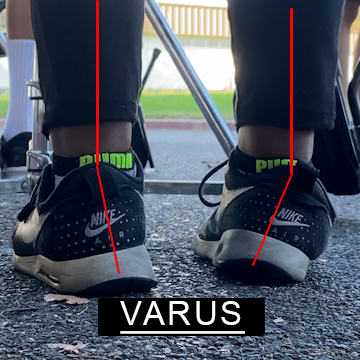
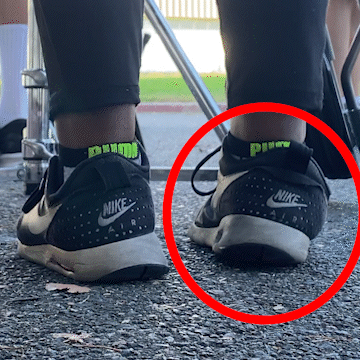

Spotting the Risk from Shoes: One way to anticipate the likelihood of an ankle sprain is by examining the wear pattern on the back of a person's shoes.
Varus: If the outer edge of the heel is worn down more than the inner edge, it indicates that the person has a tendency to put more weight on the outside of their foot (Varus). This can predispose them to inversion sprains.
Valgus: Conversely, if the inner edge of the heel is more worn than the outer edge, it suggests a tendency to put more weight on the inside of the foot (Valgus), which can lead to eversion sprains.
What YOU Can Do About It!
Incorporate ankle stability training into your dynamic warmup. Consistent training will develop the ankle stabilizing muscles to reduce risk of injury and improve athletic performance on the floor!
Here are 3 exercises to improve ankle stability:
1.Ankle Eversion

Place the inside half of your foot on the edge of a bench or ledge. Rest your upper body weight directly over your knee. Slowly allow the pinky toe side of your foot to drop until you feel a stretch on the outside of your lower leg, then raise the outside edge of the foot up towards the sky to feel the muscle squeeze. Repeat 15-20 times.
2.Ankle Inversion

Place the outside half of your foot on the edge of a bench or ledge. Rest your upper body weight directly over your knee. Slowly allow the big toe side of your foot to drop until you feel a stretch on the inside of your lower leg, then raise the arch of your foot up towards the sky to feel the muscle squeeze. Repeat 15-20 times.
3.Single Leg RDLs

This exercise improves stability in the leg and will deliver quite the burn down in the ankle! Balance one leg with a soft bend in the knee. Hinge the trunk forward from the hip while driving the leg back. Aim for a flat pelvis and avoid lifting the unsupported side of the pelvis! Do 5-10 repetitions on each foot for 2 rounds.
Want a stronger marching band with better endurance? Book a Forte Athletics Clinic! Email info@forteathletics.net


